|
|
|---|
Friday, December 31, 2010
Inque Nails: My Customized Snakeskin Print Nails!
So we've just had Christmas, and now we're all moving into the new year! This period of time is so suited for reflection as well as looking ahead. And speaking of looking ahead, I seriously think Inque Nails is going to be one of the up-and-coming trends in the future - if not in the near future, then somewhere down the road in the next few years. The arrival of Inque Nails is going to make Minx so passe (and seem so expensive by comparison).
Inque Nails is like nail art - but better. For one, you don't have to spend time labouring over your nails (although I know some people like to!), and for another, the designs come out perfect, everytime (good for klutzes like me). Inque Nails comes in the form of stickers the size of your entire nail plate with designs on them, that you stick onto your nails.
But the unique selling point of Inque Nails is not just that they're nail stickers, but that they're custom-sized down to each individual nail, and that you can pick from over 180 designs, or even create your own. Cool right? The moment I heard about these, I absolutely HAD to try them.

Here's what a sheet of Inque Nails looks like. In order to size the vinyl nail stickers to your nails, you have to upload a photo of your nails according to their specifications. If you don't want to do that, they have standard-sized nail stickers available as well.
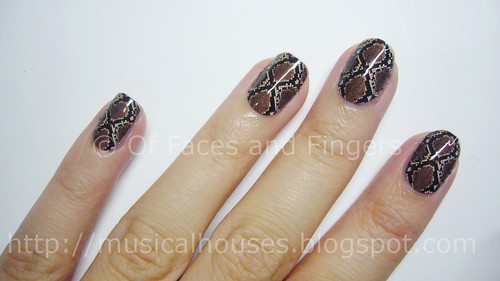
Inque nails have the coolest designs ever - I believe mine was Snake 4, a really awesome snakeskin print. Some of my favourites are Cheetah (cheetah print woo!) Freaky Zoo (giraffe print now), as well as Stars (literally stars in a night sky - very cool). They also print out whatever design you want - you could even upload Justin Bieber and Miley Cyrus and have your nails decorated with them, if you wanted to. *Starts puking*.
Anyway, before I get stoned by the Miley/Justin fanclub, I'd better mention that these nails are actually easier to apply than they look. They are in sticker form, so you have to peel and stick, and then set the stickers by passing them under a heat source (a hairdryer in this case) so that the stickers adhere better. Cool right? These actually stay on for pretty long - your nails will likely grow out before they fall off.
Here's how my nails looked with the nail stickers on. Look ma, cool nails!
If you can't already tell, I'm absolutely hyped up about this, because it's just so friggin cool. If you want customized nails (you know, like Justin Bieber or your dog on every single one of them), or if you want nail art that will stay on for a few weeks and not fall off, or if you just want to try the next big thing, this is it. And you can thank me for tipping you off later. Inque Nails are available from the Inque Nails Website, they ship internationally (YAY!) and cost USD$20 to size your nails, and US$15 for a set (which is cheaper than Minx, or even going to your nail salon to get them to paint your nails a boring pink).
(Product was provided for review. Review is my complete and honest opinion. I am not affiliated with or compensated by the company.)
Inque Nails is like nail art - but better. For one, you don't have to spend time labouring over your nails (although I know some people like to!), and for another, the designs come out perfect, everytime (good for klutzes like me). Inque Nails comes in the form of stickers the size of your entire nail plate with designs on them, that you stick onto your nails.
But the unique selling point of Inque Nails is not just that they're nail stickers, but that they're custom-sized down to each individual nail, and that you can pick from over 180 designs, or even create your own. Cool right? The moment I heard about these, I absolutely HAD to try them.

Here's what a sheet of Inque Nails looks like. In order to size the vinyl nail stickers to your nails, you have to upload a photo of your nails according to their specifications. If you don't want to do that, they have standard-sized nail stickers available as well.
Inque nails have the coolest designs ever - I believe mine was Snake 4, a really awesome snakeskin print. Some of my favourites are Cheetah (cheetah print woo!) Freaky Zoo (giraffe print now), as well as Stars (literally stars in a night sky - very cool). They also print out whatever design you want - you could even upload Justin Bieber and Miley Cyrus and have your nails decorated with them, if you wanted to. *Starts puking*.
Anyway, before I get stoned by the Miley/Justin fanclub, I'd better mention that these nails are actually easier to apply than they look. They are in sticker form, so you have to peel and stick, and then set the stickers by passing them under a heat source (a hairdryer in this case) so that the stickers adhere better. Cool right? These actually stay on for pretty long - your nails will likely grow out before they fall off.
Here's how my nails looked with the nail stickers on. Look ma, cool nails!
If you can't already tell, I'm absolutely hyped up about this, because it's just so friggin cool. If you want customized nails (you know, like Justin Bieber or your dog on every single one of them), or if you want nail art that will stay on for a few weeks and not fall off, or if you just want to try the next big thing, this is it. And you can thank me for tipping you off later. Inque Nails are available from the Inque Nails Website, they ship internationally (YAY!) and cost USD$20 to size your nails, and US$15 for a set (which is cheaper than Minx, or even going to your nail salon to get them to paint your nails a boring pink).
(Product was provided for review. Review is my complete and honest opinion. I am not affiliated with or compensated by the company.)
Thursday, December 30, 2010
Mini Christmas haul & Shu Uemura Cleanser review
Hi everyone!
I hope you all had a lovely Christmas! I think i ate way too much chocolate and food, argh which means i'll have to do a lot of exercise to burn off all the fat! There is still one more day until New years, but i know some of you are from Australia etc. so it will be tomorrow for you , so Happy 2011 to you guys!!!
I won't be posting a New Years resolution as i never really stick to it, especially when it concerns: eat healthy, drink more water and exercise! Plus i think i say the same thing every year anyways! But i do look forward to reading yours!
By the way, I know I should have said this sooner but i do notice new followers (hello, welcome, welcome!) I always try to check out your blogs too, but sometimes it doesn't work, so if you could kindly leave your blog URL and so i can stalk- i mean check out your blogs too! =)
Shu Uemura skin purifier, it's limited edition (i think i might buy another one)


It comes with a card instruction, thank God for that! I would have used it all wrong! So basically you need dry hands and face for this, pump 3-4 times of the purifier and rub it onto your face, then add a little water so it foams up, then rinse it off.
What it does:
- Balancing cleansing oil
- suitable for all skin types including sensitive skin
- 3in1; it cleanses, removes make-up and eye make-up and it's balanced and non-oily
My Verdict:
(+) It leaves my skin really soft and i do see a slight difference in my skin, it looks cleaner and my pours look clearer. I've only used it for a week, but so far so good!
(+) It removes my make-up really well, even water-proof mascara. M skin feels more balanced and it doesn't leave my skin oily at all.
(+) Packaging is quite unique, i love the picture
(-) It smells like tea tree oil, i'm not a fan of that smell, but it's bearable i guess
(-) I don't like the fact that my hands and face has to be dry to use this because i use it after brushing my teeth and i have to make an effort to dry my hands off to apply it.
(-) It runs out so quicklyyyy! I've limited myself to 2pumps per use now in order to reserve it!
I was a little sceptical at first as it was an oil and i have a combination of oily and dry skin (i have dry patches) and i thought the cleanser would make me breakout and add more oil to my skin, but surprisingly it didn't and it left my skin moisturised and soft. I definitely recommend this! 5/5

I also received two samples of white recovery cleansers, i think i'll give one away if it's good =)
--------------------------------------------
Perfume Refill spray


This is such a cool gadget! I kept seeing it on Youtube and thought i'd give it a try. It's really simple to use, and really handy. I'm really tempted to go into a perfume shop and fill it up with their perfume, would that be stealing?
------------------------------------------
Artistry Lipgloss

Called Spontaneous

Oh yeah, i got a new haircut, i don't really like my fringe so you won't be seeing much of my hair for a while!

I applied Dior lipstick in 254 X-Mauve then the Artistry gloss on top.

L-R: Dior Lipstick in 254 and Artistry Lipgloss in Spontaneous
This is my favourite shade of Dior Lipstick by the way =)
-------------------------------
Penhaligon perfume & leather Case

Penhaligon's mini perfume bottles, how adorable! My favourite is Ellensia.

It came with a leather case.
-------------------------------
Dazzle Dust by Barry M

Barry M Dazzle Dust in 014


Bronze/brown. It's really pigmented and sparkly, it's a fab colour!
So that's my haul, i think this is my first ever haul!! Hope you enjoyed it! Have a lovely new years if i don't post before then!
Lots of love! xX <3
Wednesday, December 29, 2010
Maybelline shadow stylist- Review and swatches
Hi lovely ladies,
The year is coming to an end. So what are your New Year resolutions for 2011? I haven't made any because I know that I'll never follow them. he he!! Anyways wish everyone all the best for an amazing New Year!!! Enjoy<3
So today I'm reviewing Maybelline Shadow Stylist loose powder 620 Contemporary white.

I bought it on my trip to Delhi. I wanted some unique product for my eyes, when i saw this the bell rang in my mind. I love silver shade and always look for it in different brands so without wasting my time I bought it.

The Maybelline Shadow Stylist is loose powder eye shadow in a bottle with a sponge tip applicator. I bought it in white pearl shade, the price of this product is Rs 325.

Directions for use:
* Shake package. Tap off excess powder.
* Use the unique sponge tip applicator to apply one layer to your eyelids for a basic look.
* Apply more pressure during application for more color and intensity.
* To further intensify the look, add lighter shades to highlight and darker shades to contour your eyes.
Why I love this product:
It is unique in many ways.
The packaging is lovely like a nail polish or eyeliner and is very cute.
Very easy to keep it in my purse or vanity case. Very comfortable in applying on my lids.
One coat is enough for getting a natural pearl shade.
Amazing blending by its applicator. After one coat, my lids look bright and even. It can be applied on the brow bone for highlighting.
It evens out my lid colour.
It can be mixed with other dark shades too to create a party style look.
.
This shimmer shadow so beautifully decorates the eyes with it's shimmery effect.
Glides on so easily and covers the whole of the lid in 1 or 2 swipes...Isn't that amazing! I've used many Maybelline shadows and none of them were very pigmented or shimmery but this loose powder is really amazing. Well done Maybelline:))
I'll surely get some other shades too like black, green, brown, blue etc.
Cons-
The quantity is really less.
Here is the swatch. Only 2 swipes without any base-

Anyways it is a lovely product so I'm satisfied.
So ladies hope you liked this product because I surely did! Have you tried any other shades? What do you think?
Benefit Boi-ing Concealer/Shadow Base Swatches
Benefit's Boi-ing is one of the most popular products in their entire lineup. These are billed as concealers that double as shadow bases, but empirical anecdotes from users seems to provide the opinion that while these are great as concealers, their use as shadow bases is much more limited. Still, these are quite popular, so there is something to them.
As is usual in most parts of Europe and Asia, Benefit didn't bring in the darker shades, so 03 Deep is missing. But here are swatches of 01 Light and 02 Medium:

01 Light would probably be my shade if I had to pick a colour from the range, and I'm about NC20. 02 Medium looks to my eye to be around NC30-35, maybe.
One of the reasons why Boi-ing is so popular is because it's very pigmented. So it's probably useful for concealment of blemishes and undereye circles. These swatches were probably a couple of swipes, and you can see that the coverage is excellent. The consistency and texture of the concealers was also good - they strike a nice balance between pigmentation and a texture that glides.
So do you need this? Well, for one, 3 shades out of a gazillion human skintones means that not everyone will be able to find a match, which would make the question moot. But if you do have a match, and want something pigmented, then these are worth looking into. But of course, weartime would vary from person to person, so that may be the deciding factor in the end.
Monday, December 27, 2010
Katy Perry's Nail Polish Collection
Another celebrity launching a nail polish collection, but I have to say, Katy Perry's collaboration with OPI, is pretty good. I really like the colours, and I think that the effect that the Black Nail Polishes gives it's amazing.


Above is the effect that the Black Nail Polish gives, as when it dries, cracks and creates a cracked/leopard pattern when applied over dried nail lacquer. The Name of these Polishes is From the right: Last Friday Night, Not Like the Movies, The One That Got Away, Teenage Dream and Black Shatter. These will be available in the UK from January, and you can get them at Selfridges for £9.95.
Cheap and Awesome: Jordana Lip Shine Natural Glaze in Watermelon Punch
Jordana is one of those US drugstore brands which is much overlooked at ol' Walgreens, that establishment of value-seekers like myself. I believe a selected range of Jordana products can also be found in some parts of Asia (I know Singapore carries some of them), but they're not worth buying in Asia as they're way overpriced. But in the US, they're a cheap and cheery brand, and they actually have some very good items.

Case in point - the Jordana Lip Shine Natural Glaze in 02 Watermelon Punch. These come in little click-pen dispensers with a brush at the end, a la the Stila lipglazes. These are also half the size of your typical Stila Lipglaze, but they're also definitely less than half the price, so I'm guessing value-wise they're still better. Jordana has two ranges of Lip Shines, Natural Glaze and Shimmer Glaze, and from what I hear, the Natural Glazes are way better than the Shimmer Glazes, which tend to be too frosty for most people's preferences.
Here's a swatch of the lipgloss:
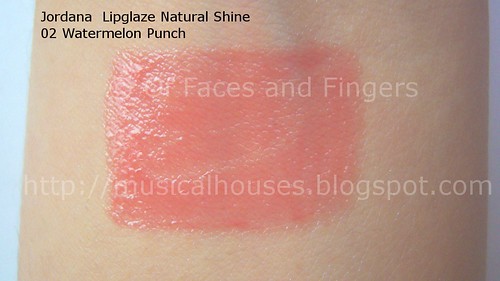
02 Watermelon Punch happens to be a gorgeous coral colour. It's a pretty universal shade, so I do think that anyone could wear it. There isn't any shimmer or glitter in this one, which suits my preferences just fine. I also like the semi-sheer, jelly-like texture of the lipgloss - it's not as pigmented as I usually like my glosses to be, but it shows up enough for me. It probably wouldn't overwhelm girls who don't like too much pigment either, since it's semi-sheer - I guess it's a happy in-between.
Here's a swatch of Watermelon Punch on my lips:

As you can see on my lips, it also replicates that jelly-like, semi-sheer texture, producing a very glossy finish. I quite like this, really. I just wish it was a bit more pigmented, but at least it's not totally sheer. The Jordana Natural Glaze range actually reminds me a little bit of the Rimmel Vinyl Glosses.
So do you need this? If you do happen to be passing by a Walgreens and see this lying around, I think it'll be worth grabbing a couple. It's cheap, cheery, and actually pretty good.

Case in point - the Jordana Lip Shine Natural Glaze in 02 Watermelon Punch. These come in little click-pen dispensers with a brush at the end, a la the Stila lipglazes. These are also half the size of your typical Stila Lipglaze, but they're also definitely less than half the price, so I'm guessing value-wise they're still better. Jordana has two ranges of Lip Shines, Natural Glaze and Shimmer Glaze, and from what I hear, the Natural Glazes are way better than the Shimmer Glazes, which tend to be too frosty for most people's preferences.
Here's a swatch of the lipgloss:
02 Watermelon Punch happens to be a gorgeous coral colour. It's a pretty universal shade, so I do think that anyone could wear it. There isn't any shimmer or glitter in this one, which suits my preferences just fine. I also like the semi-sheer, jelly-like texture of the lipgloss - it's not as pigmented as I usually like my glosses to be, but it shows up enough for me. It probably wouldn't overwhelm girls who don't like too much pigment either, since it's semi-sheer - I guess it's a happy in-between.
Here's a swatch of Watermelon Punch on my lips:
As you can see on my lips, it also replicates that jelly-like, semi-sheer texture, producing a very glossy finish. I quite like this, really. I just wish it was a bit more pigmented, but at least it's not totally sheer. The Jordana Natural Glaze range actually reminds me a little bit of the Rimmel Vinyl Glosses.
So do you need this? If you do happen to be passing by a Walgreens and see this lying around, I think it'll be worth grabbing a couple. It's cheap, cheery, and actually pretty good.
Sunday, December 26, 2010
a question about pigments and brushes
Hi Robin. It's me again. Lol...I have been watching all ur YouTube videos :-) can't wait for the flowers and Ed hardy designs.. I do have a question tho..in ur 1 video u talk about using pigments. Aka eyeshadow powders. Now how do I make the shadow to adhere to my nail? Is it hard to remove?
I have also seen ur tutorial on art brushes and cutting them. I have a stripper brush I bought at sally's. (3pk cost 17.00) I'm afraid to cut them cuz they cost so much. But my stripper brush just goes flat now. Is the brush bad? It's flattened only when I load it. Even if it's a lil it still flattens out :(. Idk y.
Oh and btw
YOU ROCk
All ur tips and tricks. The sharing u do is sooo awesome..
hi sandy!
it is not hard to get pigment off at all, just basic polish remover...but, getting it to adhere is tricky..
you can buy foil adhesive on ebay. nail art foiling adhesive, foil glue, foiling glue etc.
you can also go to the craft store and ask them to order foiling glue if they dont carry it
the other thing to note is that it should be thin and dry fast.....some foiling glues are for clothing and dry slowly. i have heard you can use "tacky" glue, but i have never used it. i have also heard you can use glycerine and water....i have not used that either.....i have used water and pigment mixed together but it must be very dry before topcoating...and here is the second thing..lol
when you topcoat it might 'crinkle' there is a chemical reaction to some foils......however, if it does...it should lay back down in about 5-10 minutes when the reaction is 'over' and then you topcoat with a second coat..............the reaction sucks.........some foils do it and you cant do anything about it..................however
howeverrrrrr....the ones who do work? ----look so frigging beautiful that it is worth practicing and learning how to use pigments...also, you can match your nails to your eyeshadow perfectly and look very hot and subtle......i use pigment all of the time and each one i HAVE to test drive to see if it works.....
i hope this helps you!
as for the striping brush..........if it is real hair.....cut a few hairs off of the side (never the middle and cut them at the base...never half way down............just 'thin it out'...if it is still flat, its dead...if it comes back to life, yay!!!! synthetic hair stripers suck..............and 17 for 3 sounds like synthetic...a good striper brush costs me about 20 bucks each....but? who knows? you might have gotten a deal!!!!! anyway, the one i bought last has lasted me at least 9 years...so, its worth it!! she is getting old though and i will miss her when she is gone!!! xoxooxoxxo
you are so welcome for the tips and thank you so much for the questions!!!..tell everyone you can and i will be so grateful back to you! i am only one voice and i cannot do this alone!!! xoxoxooxox
robin
Saturday, December 25, 2010
Tips and cures for dark under-eye circles
Hi beauties,
Christmas is over, you all must have enjoyed your festival and parties and i hope now you all ladies would be in a holiday mood. So friends, enjoy your holidays but take care of your health and beauty as well.
Now let's come to the point. I'm writing this post for my facebook friend and readers Saba and Nisha, who had written me about their under eye dark circle problem some days ago but I hadn't given any reply because I thought that this being a major problem with many people, I can help them by doing a post about it.
So girls, now I'm writing a full post for solving your problem because I wanted to answer in detail.
Dark under eye circles: Dark under eye circle is a common problem, which is caused by lack of sleep, fatigue, stress, dietary deficiency or disease. It is generally easy to spot people with chronic insomnia by the tell-tale circles around the eyes. Sleep is very essential both to health and beauty.

What should you do?
If insomnia is your problem, or you suffer from frequent fatigue, you must consult your doctor. With medical help, you should follow a daily beauty routine.
Remember that the skin around the eyes is very delicate so choose your cosmetic products with care.
Every night cleanse the skin around the eyes with a rehydrant gel or cleansing milk, using moist cotton. Then apply an under eye cream. Products that you are using around the eyes must be very light in texture.
An under eye cream, containing lanolin and almond is ideal. Almond helps to remove dark circles as it is a mild natural bleach. it is also an excellent skin food. Remove the cream with moist cotton wool after ten minutes.

No cream should be left on the skin around the eyes for long periods.
You have to take care of your diet as well. A balance diet which contains a lot of green vegetables, proteins, Vitamins and minerals is essential.
Soak 2 or 3 almonds in water for the night. In the morning peel them off and eat them.This too helps to reduce dark circles.

Drink 10 to 12 glasses of water. Eat fresh seasonal fruits.
Some home remedies which can help:
Soak 1 almond in water in an earthen bowl for the whole night. Peel off the almond and then grind with raw milk. Mix some drops of honey and apply around your eye area. Leave it for 10 minutes and then wipe gently with moist cotton wool. it's a very useful way to reduce darkness.Almond is the best ingredient especially for the skin around the eyes. No doubt, it has a mild bleaching effect and removes under eye circles.
Potato is also useful for skin around eyes but it is much effective to reduce puffiness around the eyes.
Some exercise is very helpful for the dark circles.
In the morning when you get up from your bed, rub your palm with each other. When you feel hot, keep your palms on your eyes and cover them for some time. Remove them slowly. Do it 2 or 3 times & you'll surly see the difference after some months.
You have to be patient if you want to get rid from this problem.
Some products which can help:
There are a lot of products for dark circle in the market. You can use Shahnaz Hussain's Shasmooth, L'Oreal under eye cream. Garnier, Oriflame's and Avon's products can be used too. In my opinion, Shasmooth is a very good product for this problem. I'll soon review it.
Use a good concealer during makeup for these dark circles.

Try to be happy, smile and enjoy your life without any tension. Be positive, it is very necessary for your beauty and health. Life is the name of ups and downs, happiness and sorrow but if you face it with positively, you always will be the winner.
Saba and Nisha I hope this is helpful.
If you can, give any useful suggestion for this problem. You all can also help them.
And by the way wanted to make an announcement.I've reached 300+ followers so I'm planning to have a nice giveaway once I reach 350 followers. So hope it
happens quickly and be ready guys!!
Happy holidays:))
Incoco Nail Polish Strips Review/Tutorial: 24 Karats: Gold Bling
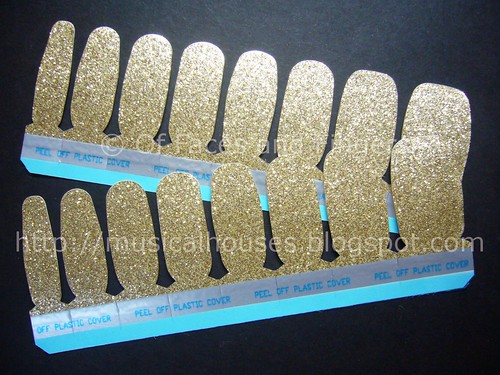
Merry Christmas everyone! In the spirit of Christmas, I'm going to talk about one of the most gorgeous gold nail polishes I've ever seen - but it doesn't even come in a bottle! Incoco Nail Polish Strips in 24 Karats is a gold glitter that blings and shines under both low light as well as strong light, and it's absolutely gorgeous to look at. It's also perfect for the festive Christmas season just upon us!

Incoco calls their products dry nail appliques, but they're strips of nail polish that you peel off from a backing and stick onto your nail. Pretty cool, right? I've tried a couple of them, and while they do have a slight learning curve, once you get them right, they're very easy to use, and produce a very professional effect.
However, it can get a bit used to applying nail polish strips instead of liquid nail polish, so here's a step by step guide of how to apply them:
1. Find the size of nail strip that most closely matches the size of your nail, and tear off the relevant nail strip. In this case below, I'm using the last strip for my little finger.
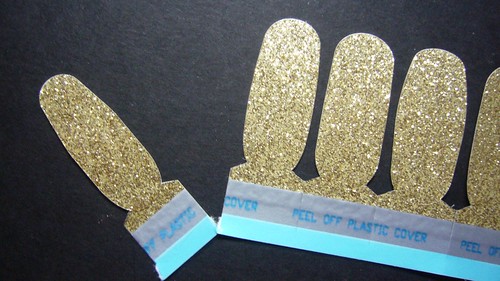
2. Peel off the plastic covering on top of the strip. Then peel off the nail polish strip from the paper backing. Be careful not to tear the strip when doing this!
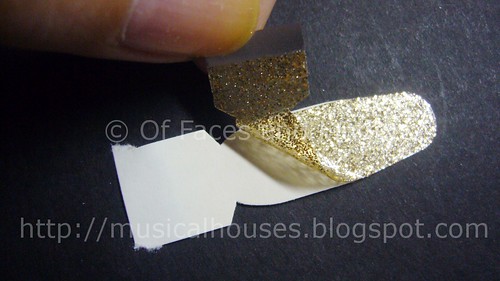
3. Gently smooth the strip over the nail. I personally find the easiest way to do this is to start with center of the nail, and smooth out towards the sides to avoid any wrinkles in the strip.
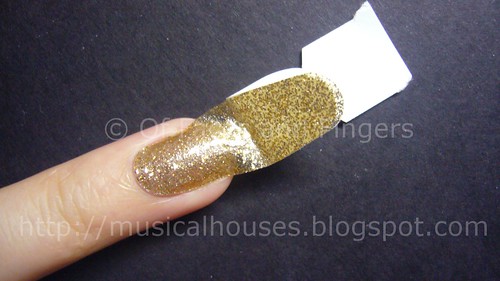
4. File off any excess nail polish strip. I think the best way is to file downwards, isntead of from side to side. This way, the strip isn't disturbed by any filing motion.
5. And viola! All done.

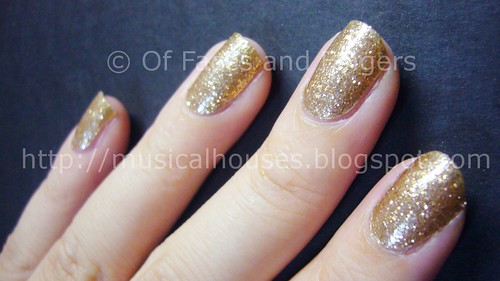
I guess the fit of the appliques for the nails would vary from person to person, but for me, I found that I was able to find a match for all my nails. I thought the strips were nicely sized, and they also matched the natural curvature of my nails and cuticles. I also liked that these strips were very thin, unlike some other nail appliques I've tried, and thus easier to place on the nail. As far as nail strips go, I think these are one of the best.
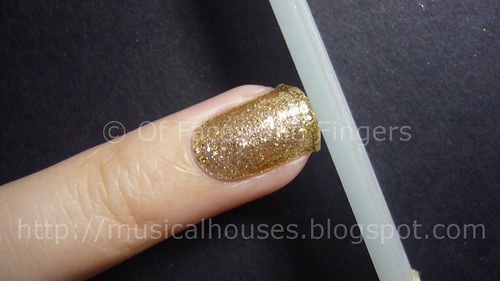
Here's 24 Karat, in it's full glory. I don't think I ever got such a neat gap by painting manually, LOL.
I've also discovered that if your nails are short, you can further save money by cutting each nail strip into half - so that instead of wasting the free end (shown in the image in Step 3), you could use it for another nail - perhaps the same nail on your opposite hand. I've managed to do this successfully, but your nails have to be pretty short in order for this tip to work.
These strips lasted about 3 days on me - a bit shorter than if I had painted my nails myself, but given that they were very little trouble to put them on, I thought it was still worth it.
One thing makes me wonder though - these strips so happen to fit the curvature of my cuticles perfectly, but I'm wondering how they would work for other women with more square-shaped cuticles. Also, I'mm wondering how the strips would work for girls whose nails are differently-sized compared to mine. My sister is tiny, and I think most of the strips would probably be too large for her teensy nails. But on me, they fit perfectly, so I'm not complaining, and I imagine they'd be fine for most women. But I could imagine on very petite girls (I'm talking about having to get your clothes from the kids' department petite, not size 2 petite here), the strips might be too small.
These strips would probably appeal to women who want to wear nail polish for special events, but who don't wish to paint their own nails or hop into a salon. I don't foresee these replacing the traditional method of painting nails due to the higher cost, but I do think that Incoco products are a beautifully executed concept, and might be worth it for that special occasion.
(Product was sent to me for review. This is my honest and complete opinion of the product. I am not compensated by/affiliated with the company.)

Incoco calls their products dry nail appliques, but they're strips of nail polish that you peel off from a backing and stick onto your nail. Pretty cool, right? I've tried a couple of them, and while they do have a slight learning curve, once you get them right, they're very easy to use, and produce a very professional effect.
However, it can get a bit used to applying nail polish strips instead of liquid nail polish, so here's a step by step guide of how to apply them:
1. Find the size of nail strip that most closely matches the size of your nail, and tear off the relevant nail strip. In this case below, I'm using the last strip for my little finger.
2. Peel off the plastic covering on top of the strip. Then peel off the nail polish strip from the paper backing. Be careful not to tear the strip when doing this!
3. Gently smooth the strip over the nail. I personally find the easiest way to do this is to start with center of the nail, and smooth out towards the sides to avoid any wrinkles in the strip.
4. File off any excess nail polish strip. I think the best way is to file downwards, isntead of from side to side. This way, the strip isn't disturbed by any filing motion.
5. And viola! All done.
I guess the fit of the appliques for the nails would vary from person to person, but for me, I found that I was able to find a match for all my nails. I thought the strips were nicely sized, and they also matched the natural curvature of my nails and cuticles. I also liked that these strips were very thin, unlike some other nail appliques I've tried, and thus easier to place on the nail. As far as nail strips go, I think these are one of the best.
Here's 24 Karat, in it's full glory. I don't think I ever got such a neat gap by painting manually, LOL.
I've also discovered that if your nails are short, you can further save money by cutting each nail strip into half - so that instead of wasting the free end (shown in the image in Step 3), you could use it for another nail - perhaps the same nail on your opposite hand. I've managed to do this successfully, but your nails have to be pretty short in order for this tip to work.
These strips lasted about 3 days on me - a bit shorter than if I had painted my nails myself, but given that they were very little trouble to put them on, I thought it was still worth it.
One thing makes me wonder though - these strips so happen to fit the curvature of my cuticles perfectly, but I'm wondering how they would work for other women with more square-shaped cuticles. Also, I'mm wondering how the strips would work for girls whose nails are differently-sized compared to mine. My sister is tiny, and I think most of the strips would probably be too large for her teensy nails. But on me, they fit perfectly, so I'm not complaining, and I imagine they'd be fine for most women. But I could imagine on very petite girls (I'm talking about having to get your clothes from the kids' department petite, not size 2 petite here), the strips might be too small.
These strips would probably appeal to women who want to wear nail polish for special events, but who don't wish to paint their own nails or hop into a salon. I don't foresee these replacing the traditional method of painting nails due to the higher cost, but I do think that Incoco products are a beautifully executed concept, and might be worth it for that special occasion.
(Product was sent to me for review. This is my honest and complete opinion of the product. I am not compensated by/affiliated with the company.)
Friday, December 24, 2010


Christmas Wishes
Dear readers,
Wishing you all an amazing Christmas wherever you all may be!! I hope you have a lovely time with family and friends, and receive joy and happiness!!
Wishing you all an amazing Christmas wherever you all may be!! I hope you have a lovely time with family and friends, and receive joy and happiness!!
 |
| Image from Google, was going to take a pic of the one in Trafalgar Square, but the students burnt it down =) |
Have a lovely Christmas guys!!
Lots of love from London xX <3
Thursday, December 23, 2010
Maybelline Eye Studio Color Plush Silk Eyeshadow
I really wanted to like this palette, but I can't make myself do anything. This yeah my father doesn't want to celebrate Christmas, or even be in town because it reminds him of my mom too much, so he bought me a new T.V and gave me some money because he felt bad that I don't get Christmas. So what did I do? I bought other people presents and bought stuff for myself, and by stuff I mean makeup. This palette was one of the pieces I picked up.
The colors are beautiful in the pan, and the colors are coordinated wonderfully, but its just... bleh. The colors are so SHEER. Its ridiculous. And annoying. They're sheer, glittery and have glitter fallout.
The colors are super soft and incredibly blendable, but without primer, they blend right into one color, one mud color. There is so much potential with this quad it drives me nuts. I'm not losing hope though. I'm going to try this using wet brushes, and hopefully I like it better.

(Green With Envy)

(Green With Envy)

(Green With Envy)
Pros: blendable. soft. wet/dry application.
Cons: sheer. glittery. fallout. needs primer.
I'm going to keep trying this product until I get fed up enough. I've also heard good things about the other quads, so I might try those.
One thumb up
<3
Kawaii Budget Beauty: Daiso Shiny Powder in Brown
Isn't this cute? It's so round and bulbous and just generally kawaii. It's Daiso's Shiny Powder in Brown, and it was a little cheapie I came across while trawling through Daiso.

For the uninitiated, Daiso is the Asian equivalent of Poundland or the Dollar Store. It originated in Japan, but its stores can be found elsewhere throughout Asia. Much like Poundland or the Dollar Store, it sells a mishmash of random products - everything from stationary to household items - but for a beauty addict like me, it also carries a line of super-cheap makeup and nail polish. And when I say super-cheap, I mean it - the items are just a couple of dollars. And I'm talking about Singapore dollars here, not pounds or USD. Awesome!
The Daiso Shiny Powder is a loose powder that's billed as being multipurpose, but in this colour, Brown, it's really more of a loose eyeshadow. The packaging is cute - there is a round twist-off cap, and under that there's another flip-top lid. Its sturdy and powder doesn't fall out of the packaging (unlike the Superdrug MUA line - the powder leaks like nobody's business).
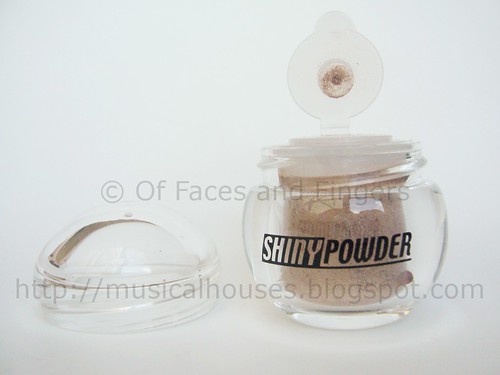
So cheap it is, and kawaii it is. But is the Daiso Shiny Powder really worth it? This is the part where I have to confess - not really, but I wouldn't complain for the price. And, I've seen makeup of similar quality go for higher prices.
Here's a swatch of the Shiny Powder in Brown.

The brown colour itself is a pretty nice colour - it's a light fawn brown that leans warm, with a medium amount of shimmer. But while I like the colour, I have to say pigmentation wasn't that great. And I thought it would improve if I foiled the colour, but for some reason there wasn't that much of a difference. But then again, in my laziness, I simply foiled the eyeshadow with water, which might not have been sufficient for foiling. Still, you'd think that for purposes of a swatch, even water would have helped more.
Here's a shot of the Brown Shiny Powder on my eye:
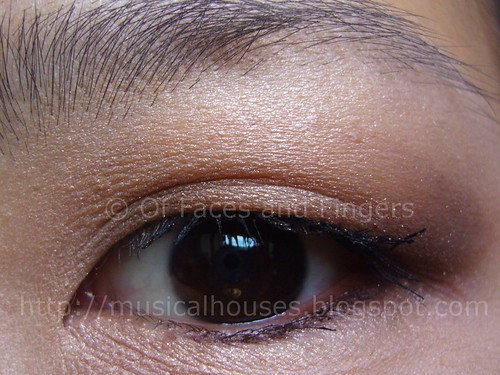
As evidenced by the swatches, pigmentation is rather light. To be fair, it's not so sheer that it doesn't show up, because you can definitely see the colour on my eyes. But it's a very light shade. On my eye, it also pulls a little bronze, although not in a bad way. It's a nice shade, really. Pity about the pigmentation.
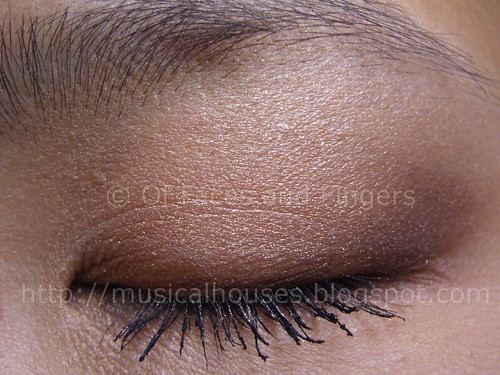
Here's a shot with my eyes closed:
So, do you need this? You probably don't, but if you happen to be in Asia and are looking for cheap makeup, this is definitely something worth checking out. And as I've mentioned before, makeup lousier than this has gone for higher prices, so it's not like it's that awful. I personally wouldn't complain given the price, but I'm just pointing out that if you're willing to spend, there is better out there. But if nothing else, there's always the adorable, kawaii packaging to induce your buying tendencies.

For the uninitiated, Daiso is the Asian equivalent of Poundland or the Dollar Store. It originated in Japan, but its stores can be found elsewhere throughout Asia. Much like Poundland or the Dollar Store, it sells a mishmash of random products - everything from stationary to household items - but for a beauty addict like me, it also carries a line of super-cheap makeup and nail polish. And when I say super-cheap, I mean it - the items are just a couple of dollars. And I'm talking about Singapore dollars here, not pounds or USD. Awesome!
The Daiso Shiny Powder is a loose powder that's billed as being multipurpose, but in this colour, Brown, it's really more of a loose eyeshadow. The packaging is cute - there is a round twist-off cap, and under that there's another flip-top lid. Its sturdy and powder doesn't fall out of the packaging (unlike the Superdrug MUA line - the powder leaks like nobody's business).
So cheap it is, and kawaii it is. But is the Daiso Shiny Powder really worth it? This is the part where I have to confess - not really, but I wouldn't complain for the price. And, I've seen makeup of similar quality go for higher prices.
Here's a swatch of the Shiny Powder in Brown.
The brown colour itself is a pretty nice colour - it's a light fawn brown that leans warm, with a medium amount of shimmer. But while I like the colour, I have to say pigmentation wasn't that great. And I thought it would improve if I foiled the colour, but for some reason there wasn't that much of a difference. But then again, in my laziness, I simply foiled the eyeshadow with water, which might not have been sufficient for foiling. Still, you'd think that for purposes of a swatch, even water would have helped more.
Here's a shot of the Brown Shiny Powder on my eye:
As evidenced by the swatches, pigmentation is rather light. To be fair, it's not so sheer that it doesn't show up, because you can definitely see the colour on my eyes. But it's a very light shade. On my eye, it also pulls a little bronze, although not in a bad way. It's a nice shade, really. Pity about the pigmentation.
Here's a shot with my eyes closed:
So, do you need this? You probably don't, but if you happen to be in Asia and are looking for cheap makeup, this is definitely something worth checking out. And as I've mentioned before, makeup lousier than this has gone for higher prices, so it's not like it's that awful. I personally wouldn't complain given the price, but I'm just pointing out that if you're willing to spend, there is better out there. But if nothing else, there's always the adorable, kawaii packaging to induce your buying tendencies.
Subscribe to:
Comments (Atom)

