This is the same eyeshadow look that I'm wearing in my previous post (Neutral Eyes, Red Lips). I just thought I would show you how I went about doing it! I use more or less this same technique for any eyeshadow that I wear. The names of all the products are listed below but here's a photo of everything that I used anyway! ...


 2. Blend MAC Soba eyeshadow onto the outer half of the lid and into the crease with a fluffy blending brush like the MAC 217.
 3. Using a flat brush like the MAC 239, bring some of that Soba eyeshadow underneath the lower lash line too.
 4. Using the same 217 brush that was used before (I just wiped it off), apply MAC Dazzlelight eyeshadow to the inner half of the lid. Take a bit onto the tear duct area too. This opens up the eye.
 5. With a small pointed brush (I'm using the Laura Mercier Crease Brush), take some of the golden brown shade from the NARS Surabaya Duo and apply it to the very outer corner and slightly into the outer part of the crease so that it creates a 'c' shape.
 6. On the 239 brush take some of that NARS eyeshadow underneath the eye - only on the very outer part of the lower lash line.

7. Now the harsh shape of that darkest eyeshadow needs to be blended out. Take a bit more MAC Soba eyeshadow on the 217 brush and go back into the crease with this, using it to blend out the dark NARS eyeshadow. I tend to blend in both windshield wiper and small circular motions.
 8. Take some MAC Vanilla eyeshadow (or any shadow which is about a shade lighter than your skin tone) on a MAC 222 brush and apply it under the eyebrow on the brow bone. This adds a bit of a highlight as well as softening the edges of the crease colours, making sure everything is blended really well.
 9. Line your top lash line and wing it out if you want to. I'm using a cake eyeliner and a Louise Young LY24 brush. I've already done a winged liner tutorial so if anyone wants to take a look at that you can do so here. Line your water line too with whatever you like to use (I use Clinique's Cream Liner in black). Apply mascara and that's it! You can always add false lashes here too - I used half lashes with this look in my previous post.
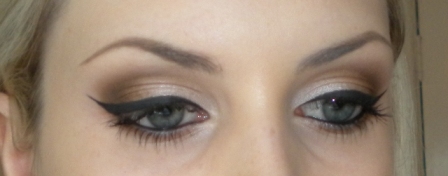
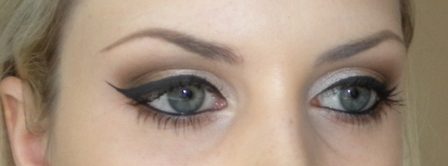
Voila! Hope that was somewhat useful! Here's the finished look (you can also of course see the full effect of this look in my previous post!) ...


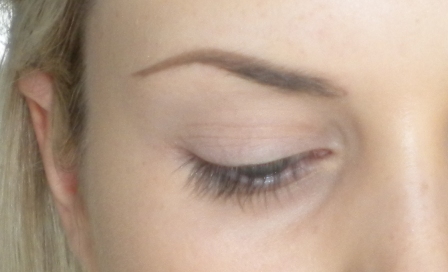
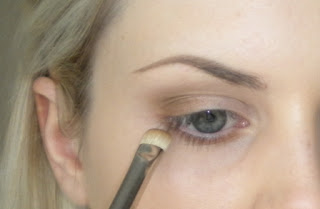
1. Apply MAC Painterly Paint Pot as a base all over the lid. You can of course use any base or primer that you like. I just prefer Painterly because it covers redness and leaves a nice blank canvas. I apply this just using my finger.
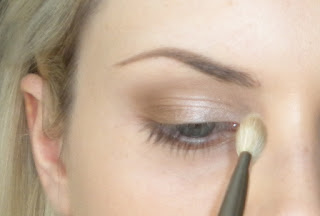
 2. Blend MAC Soba eyeshadow onto the outer half of the lid and into the crease with a fluffy blending brush like the MAC 217.
 3. Using a flat brush like the MAC 239, bring some of that Soba eyeshadow underneath the lower lash line too.
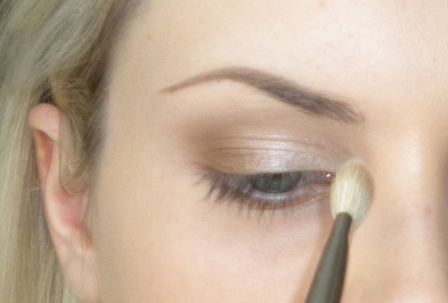 4. Using the same 217 brush that was used before (I just wiped it off), apply MAC Dazzlelight eyeshadow to the inner half of the lid. Take a bit onto the tear duct area too. This opens up the eye.
 5. With a small pointed brush (I'm using the Laura Mercier Crease Brush), take some of the golden brown shade from the NARS Surabaya Duo and apply it to the very outer corner and slightly into the outer part of the crease so that it creates a 'c' shape.
 6. On the 239 brush take some of that NARS eyeshadow underneath the eye - only on the very outer part of the lower lash line.
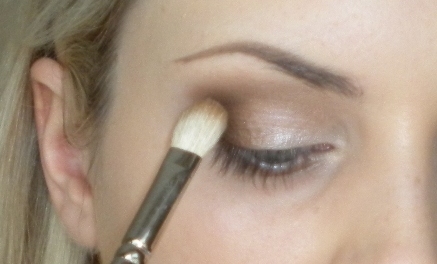
7. Now the harsh shape of that darkest eyeshadow needs to be blended out. Take a bit more MAC Soba eyeshadow on the 217 brush and go back into the crease with this, using it to blend out the dark NARS eyeshadow. I tend to blend in both windshield wiper and small circular motions.


Voila! Hope that was somewhat useful! Here's the finished look (you can also of course see the full effect of this look in my previous post!) ...