|
|
|---|
Sunday, October 31, 2010
Beyonce inspired mani
Chambor Enriched Rivitalizing Makeup(liquid foundation)
Hello everyone,
Hope you all had a great weekend!!! And all set for Diwali....Wish you all a very Happy Diwali in advance.
Foundations are a must in a makeup kit and no makeup is done without using foundations…Isn’t it?
Today I'm gonna review the Chambor liquid foundation.

What it claims: A lightweight and bendable foundation which helps to restore skin firmness and fight free radicals. This moisture- rich creamy formula modifies visible signs of aging and stay put for a radiant look all day long. Dermatologist tested.

My experience-
I must say it is all so true.
This is the best foundation I have ever used….I’ve tried many brands but this is better than all. It’s got SPF 18 which is very good.
The formula is not too creamy and it’s very light weighted. Gives a matte look. The shade matches my skin complexion perfectly and it is highly bendable. Lasts for the whole day and it is even better than Chambor’s stick foundation.

The pump up bottle is very comfortable. The long SPF protects my skin from sun damage and I love all products which protect my skin.
Price: Rs 800- 850.
The price is reasonable and this is my second bottle. It gives perfect moisture and is great for normal, dry and even oily skin.

before
It has a lovely fragrance!! The foundation exactly matched my skin tone.Gives a perfect glow to my skin leaving it flawless and radiant.The glow can be seen on the skin clearly.I need a very light touch of compact powder in summer and monsoon but in winter it can be used without any compact.The coverage is amazing.I love this foundation.

after
These days I’ve heard a lot about Revlon Colorstay foundation so really wanna try it out too and I’m even eyeing Mac studio fix….but I'll have to think some time about changing this lovely foundation from any other foundation.
Will I purchase it again? Of course yes. I'll have been trying other brands also but this will be my favorite till I don't get a better foundation than it.
So ladies which foundations do you use and which ones are your faves?? Have you used this foundation and what is your experience with this product?
Liz Earle Gentle Face Exfoliator Review with Photos
Like their other products, this one comes in their trademark light mint green packaging, and has a very nifty and hygenic pump dispenser.
The product itself is a white coloured cream with very find jojoba beads. In fact, when you first pump a ball of the product out onto your hand, you can't see any beads of exfoliatant when the product isn't spread out. Looking at the small dollop of product on my hand, I was thinking - where are the jojoba beads?
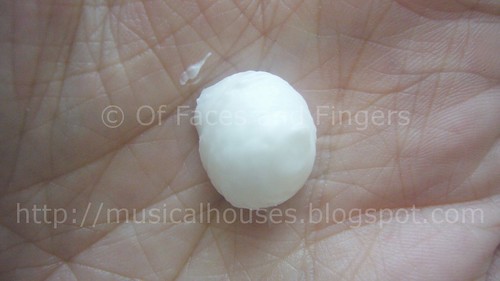
Ahh, there they are. The beads are quite fine (not super super fine, but small enough) that you only see them when you spread the product around. I hope this photo is clear enough, but you can see those little jojoba beads - they're the lumps in the product.
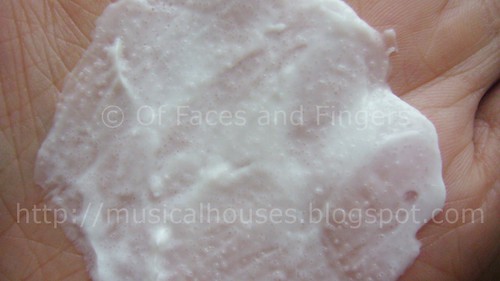
Usage of this product is simple - you massage it around your face gently, and then wash it off. It doesn't lather, but it washes off decently. Although it's exfoliating, it's also really rich, so it moisturizes really well. In fact, if you're one of those people who like your skincare to leave that squeaky-clean feel behind, you're going to be disappointed by this, because I felt like it left a slight film of product behind. It's not necessarily a bad thing - I think people with dry skins would really love this, because it doesn't strip the skin, and the rich, creamy consistency actually feels really nice on the skin. I also felt like it left my skin with a slight glow, which I liked.
However, I do imagine it could be too rich for some skins, because one of the main ingredients, cocoa butter, is comedogenic for some people. So if your skin is oily, acne-prone, or sensitive, then this is a product that would probably be best used occasionally, instead of everyday. I used it without any major issues, although I was very worried about the cocoa butter breaking me out. (You see the risks I put my skin through to test products for you guys! :P ) I suppose part of the reason why I didn't end up developing any pimples is because as an exfoliator, this wasn't part of my everyday routine. I was using it weekly without issue, but I suspect that if I used it everyday, my skin might react to it.
Although most people could probably use this on a weekly basis without any major issues, although this product would probably appeal most to those with dry skin that isn't acne-prone or sensitive. If your skin has no major sensitivies to cocoa butter or any of the other ingredients, I think the Gentle Face Exfoliator is nice to have. It exfoliates without drying out the skin, and it has a rich, luxe creamy formulation that is pleasant to use.
(Product was sent for review. Not affilated with/compensated by company. Review is my complete and honest opinion.)
Friday, October 29, 2010
foil glue and pigments
1. Where do you get foil glue? is that the name of it? I've been to my beauty supply store and they don't have it, I even tried looking on ebay and nothing.
2. The pigments you talk about on your video, is that eyeshadow pigments? will the foil glue work with glitter?
(to question number 1)--i get my foil glue on ebay, but i live in a very small town. i know that wherever they sell nail art foil (that comes in long strips) they will have the adhesive. also, you can go to a craftstore and ask an attendant if they have a glue that dries and stays tacky....... i have found one once from a craft store but i dont remember the name. when i do, i will certainly put it out there.....
(to question number 2) yes!!!!!!!!!!!! what i want to do is show girls how to use their eyeshadow for their nail polish and have them match perfectly.....when you topcoat pigments, they shrink. the more metal in the pigment, the more cracking..........HOWEVER....if you apply it sparingly and then wait and allow the design to "relax" it goes back to normal...if you have glitter caked on, it turns into a big old mess, thats why your glue has to be really thin and very dry...just a very thin layers that wont "bunch up"....and YES.. you can use glitter!!!! what i would do though..is test each one out...put the glue and topcoat on yourself and see how they act before using it on a client...some pigments just dont work well, however...the ones that DO ...are stunning and worth the effort.
if you cannot find the foil glue.......while the nail is a tiny bit tacky you can sweep some pigment on...just so your nails match...you can also use water......but you cant get too concentrated of a pigment or it really bunches up.......
and lastly........but not least........is if you cannot find anything.........your pigments just arent working...........and you want to learn another way.....i am going to show you how to do all of this stuff with almost the same results with paint......BUT
RIGHT NOW........(JUST RIGHT NOW HAHAHAAHAHAH) i am in love with pigments......99% of my art is with paint....i just happened to start doing tutorials as i experimented with pigments.....so, i only have 20 videos up right now.....but i will have 100's.. maybe 1000's and i will have SO many techniques to show you guys how to get certain effects....
so, good luck on finding glue! good luck with working with pigments (it sounds way scarier than what it really is......the cracking is minor, i just dont want you to scream when it happens!!!) hahahahahahah and i hope this answers everything! have a wonderful day!!!!
robin
Stuff I'm Actually Using Up: MAC Dazzlelight
So here you go - look what I actually hit pan on lately, people!
That's MAC Dazzlight. It's a gorgeous fleshtoned neutral that packs a punch. I think I've been using it everyday for the past 6 months or so. And I know you're thinking - what's so special about this boring beige that she's using up so fast? Well, first of all it's highly pigmented. You know sheer eyeshadow shades bore me to tears, and this applies to fleshtoned neutrals as well. You see, when you wake up with those panda eyes in the morning, a bright fleshtoned neutral covers the fact that your eyes are sunken in and two shades darker than the rest of your face. And of course, it can only do that if it's reasonably pigmented.

The other thing about Dazzlelight is that it's frosty, as you can see from the swatch above. By that I don't mean chunky glitter, but I do mean so much shimmer that it's like bling for your eyes. That may, or may not, be a good thing depending on your preferences. Generally, I prefer some shimmer but not outright frost, so I do find Dazzlelight a tad too frosty for my tastes, so I exercise caution when applying. But as an eye-brightener, I can't complain that it isn't doing its job.
So now I cay say I'm officially using up something. Has anyone else recently used up something?
Thursday, October 28, 2010
Walking into spiderwebs

 |
| See the detail on the spider's eyes? |
Quick NOTD
Yesterday I put on Plum Play With Me from Catrice, and I added glitter on my thumbs and ring fingers. For the glitter I used one coat of Models Own's Purple Haze and one coat of Bourjois' Paillettes Disco. I love the glitter, might actually put it on all my nails some time.
Here are the pictures:
x
Tanja
Wednesday, October 27, 2010
Vamp

what is a blog for? questions and answers part 1. polish choices.
http://www.youtube.com/user/robinmosesnailart
http://www.facebook.com/RobinMosesArt
i have youtubes on youtube
i have networks and friends on facebook
so, why repost whats been said already?
here is where i will take questions and share little tips of information i suppose. i get tons of questions and i answer them and they scroll away and then the answer is lost...here, i can document some semblance of order, albeit rough..........it will be more orderly than a live scroll.
hopefully when i go viral i will have a secretary to keep me orderly..that would be fantastic...everyone help me achieve that.
question one: "Hey do you have any suggestions for brands of nail polish? Oh and what size is that brush? Your work is incredible!"
here is my personal opinion...every single person has a different one.
on natural nails)...if you use white distilled vinegar and dry it in a light before you polish...your polish lasts longer because it takes the oil out of your nail bed....acetone also takes out some oil....so does creative nail/scrubfresh....all good primers. prime them and make them all chalky white before you paint them and they wont chip as much. if they are all shiney and pink...they will chip up and look a mess.
basecoats are useless unless your nail polish stains and hardly any do...i can think of ONE....CLAIRES makes this ugly purple that stains. (but, i use acrylic...i dont like doing natural nails...i bet people with natural nails will go on and on in disagreement about staining but i dont know natural nails, i PAINT on false nails.......i put the false nails on so that my paintings last longer....so, i am not a good 'natural nail' manicurist to talk to, however, i do paint them and this is what has worked for me without a 50 dollar answer.
TWO thin coats of polish SHOULD cover..if you need more...throw the polish away because its sucky.
to me, cheaper is better. i love wet and wild. you can mix them easily into more exotic colors..the brushes are usually managable...they dry quick and if you leave one open...no biggie....you buy another one because its not 20 bucks. i go through about 10 bottles a week. i mix them all of the time. if you want to be creative...go to walmart in the art section and get a color wheel... then youtube how to use one and mix all of the colors you want using wet and wild colors..its cheaper, its more fun and you get the color you love most.
"but robin, dont you like OPI"
i have found that OPI takes forever to dry....they make stunning colors....but i am mixing and matching and painting OVER the color anyway, so i dont really benefit much from subtle different shades......i benefit from good brushes.......OPI is for the natural nail manicurist and the manicurist who follows the trends that the company tells them to follow.......i love trends..i follow some...but i dont NEED OPI to get an OPI look...........
for me.......my secret?..............the secret to great polish is: a great top coat.
i use pro-finish GOLD uv topcoat. i have for a billion years..it doesnt fail me. i am addicted to its smell like a crackhead. i need it to feel 'finished' with a design.----it is what i PAY FOR ....it is expensive but it seals my art and lasts without chipping.
(ALERT:!!! ALTHOUGH!!!)------i have heard that gel topcoats are great and i ordered some recently from hong kong....i will keep you posted!
i try out new things all of the time.....and nothing comes close to my top coat...i dont like the idea of having to file off a topcoat...however, if a gel topcoat doesnt chemically react to pigments, i will definitely make a minor switch. if i do, i will surely say so in my tutorials!
there are my questions for today. i know what i say is probably exactly the opposite of what everyone else says, but i dont read what everyone else says ever...i just practice and find what works for me so that my nails are FIERCE....and i dont settle for "eh"..........ever.
PART 2: the size of my brush
i have many brushes...i choose length and how pliable the hairs are..i prefer sable but sometimes i get a great synthetic so i dont have a 'favorite' i like dental brushes..i try and buy dental brushes in bulk ranging from size 1-4.....i use the 4's for my acrylic and my 1-3's for paint.....however, i alter my brushes by cutting them down to fit my needs. i will make a tutorial for that, but for now, i cannot get a camera angle good enough to do an effective job..i will though..i am new, but i dont want people messing up brushes because i have a bad video....id go 0 or 00 for now and dont get a short one..they are stumpy and more for dot making.....get longer hairs....but not exceptionally long....id say..somewhere in the mid-range length, smallest width possible....that is a good start! :) thank you for asking and i hope i answered everything as thoroughly as possible! xoxoxox
robin
Ponds moisturizing cold cream and Dove anti perspirant deodorant- Review
How is everyone? Hope all is well...!
Today I'm reviewing two products which I had bought recently.
So the first one is Ponds moisturizing cold cream.

I had asked Tanveer about what to use in winters coz just like my mom my skin also gets dry in winters and she had recommended to use this cream.

What it claims: moisture+ nourish+ protect
Moisture- Ponds' quenching moisturizers with Sodium PCA and glycerin that gently moisturize skin and maintain the skin hydration balance.
Nourish- Skin nourisher with soya protein, sunflower oil and skin lipids for soft supple skin.
Protect- SkinInsta- shield with mineral oil, Emmolients and sillicone conditioners protects skin from harsh winters and preserves its youthful beauty.
It is dermatologically tested.
How to use: Gently massage it on your face and neck in upward circular motions twice daily.
I was not too sure whether it is good or not so I picked up a trial pack of 30 ml just for Rs 27.
I've used it twice and found it great for winters...It's a bit sticky which is good for dry skin.
The bottle is so cute...white and blue combination.
Till now I haven't found any cons in it and I'll surely use it in winters.

Thanks a lot Tanveer my mom is very satisfied with this and has decided to buy the big bottle after using this pack. She liked Nivea cream for winters but this one is better than that.So if you guys have dry skin in winters you should surely try it and if you have how did you find it to be??
So now let's come on to the second product- Dove anti perspirant deodorant 1/4 moisturizing cream in grapefruit and lemongrass scent.

I've used deodorants from Faa, Eva and Spinz...so thought of trying out something new and picked up this.
It is dermatologically tested.
It gives a 24 hr protection which is almost true.

It has got a light smell which is a good thing as I usually don't prefer strong smelling deos....they really give me a headache!
The fragrance is lovely and the packaging is good.
Price: Rs 160
This is one of the best deodorants I've ever used...So have you guys used it??
ManGlaze Mayo: A Matte White Christmas!

ManGlaze, despite its relative newcomer status, has already been rapidly garnering a fan following, because of its grungy, edgy image. In a world where most polish brands produce masses of pinks and reds, and tack on everything from flowers to bows to annoyingly girly paraphernalia to boost sales, ManGlaze stands out, like that devil-may-care rocker chick wearing studs in a sea full of pink princess-y girls toting Hello Kitty bags.
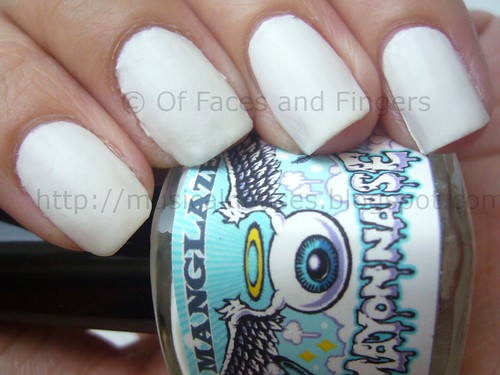
Anyway, enough about Hello Kitty and goth girls, let's get to the nail polish. Yes, this colour is hard to apply, and yes, you do need a skilled hand and a good base coat. Mayo, when compared to ManGlaze's other colours, is trickier to apply. Unlike Fuggen Ugly, it doesn't go on nicely in smooth, thin and even coats. Mayo goes on thicker, and more unevenly. My personal experience was that it's better to apply this in as thin and even coats as possibe, and do two coats, rather than attempt to apply one single thick but even coat, because this doesn't even out that nicely.
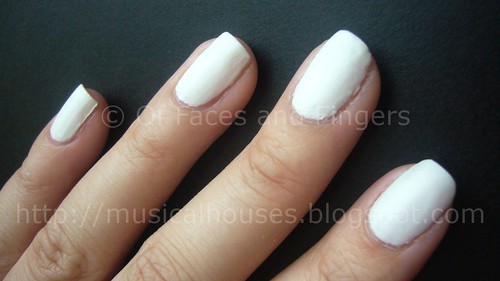
Now that I've gotten the negatives out of the way, let's talk about the positives. Have I told you how cool this colour is? It's not jet-matte-white, like OPI's Alphine Snow Matte (which honestly I think is a little boring). But this one has some very fine flecks of glitter dotted throughout the polish. Once applied however, this glitter is invisible to the eye (I myself can only see it in the bottle), but I feel like it adds a little something to what would otherwise be just another matte white.
So, do you need this? Sure, if you don't have a matte white, and you want ManGlaze's punk-rock take on it, and you can deal with the application issues. You gotta admit, there is just something attractively cool about ManGlaze's aesthetic. But if you think you might have trouble with application, I suggest you go for Fuggen Ugly, or another colour.
(This product was sent to me for review. I am not affiliated/compensated for my review.)
Monday, October 25, 2010
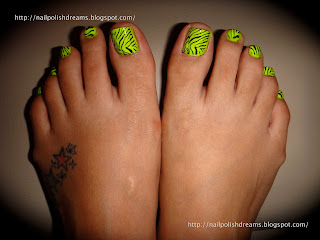
Electric Zebra!
ManGlaze Fuggen Ugly: A Fuggen Awesome NOTD!
As you might imagine, ManGlaze, with their matte shades, grungy colour names, and their punk-rock influenced aesthetic, was made with men in mind, but they've garnered huge following among ladies too. I guess you could say they're like the rock stars of nail polish, complete with controversy and all.
I know you're wondering how nail polish is supposed to be edgy, but take a look at the bottle:
The bottles are quite attractive, with graffiti-inspired drawings on them. That's pretty cool, because as far as I know of they're the only nail polish brand that makes 'em like that.
Fuggen Ugly is a matte grey-black (it's almost black, but not quite), infused with really tiny silver shimmer that gives it a certain dimension, instead of just being matte and flat. The end result is a polish that kind of looks like OPI's Suede polishes.
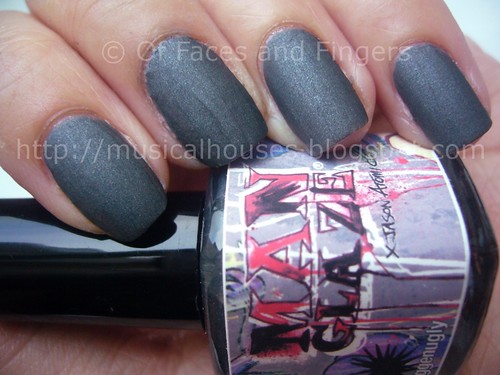
Isn't it cool? It kind of looks like the tarmac surface of a road, doesn't it? Very industrial looking. I really like it.
Application on this polish was one of the best as far as mattes go. This one went on evenly, and like most mattes it dried fast, but not too fast. Also, unlike some other matte polishes I've tried, you can layer two coats of this without it getting all weird and stringy and goopy. I really like the quality of Fuggen Ugly, and I think all the other matte polish makers ought to go get themselves a bottle of Fuggen Ugly and replicate it's ease of application.
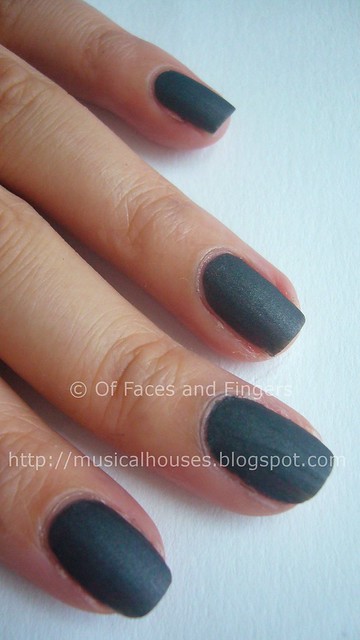
In most lights, you won't be able to see much of the silver shimmer - it just gives a certain depth and character to the polish, like in the second photograph above. However, in some lights you can see discrete bits of silver shimmer (like in the very first photograph shown), which I think is pretty cool. I actually like it better when the silver shimmer is visible, but either way the polish looks good.
Of course, ManGlaze's attempt at a matte grey-black isn't that unique - this one is going to bear comparisons to OPI's Suzi Skis in the Pyrenees Suede, Zoya's Dovima and Orly's Iron Butterfly. But of course, all the colours vary in colour intensity and shimmer density and size, so to a nail fanatic they're all worth owning. But what really makes Fuggen Ugly stand out is not just the colour, but also the gorgeous application, as well as it's really unique punk-rock positioning. And ManGlaze ships internationally too, so if you're outside the USA and having trouble getting your hands on some of the other colours, Fuggen Ugly might be worth a look at.
(This product was sent to me for review. I am not in anyway affiliated with or compensated by the company. This review is my complete and honest opinion.)
Sunday, October 24, 2010
Polka Dot Mani
I got the inspiration a couple of weeks ago, as I was standing in line in H&M. They had some posters in the cashier area and the models had something very similar on their nails.
For this one, I used Sally Hansen Complete Salon Manicure in Grey by Grey as a base, and Lavender Cloud for the dots. I inverted the colors on the ring finger just for fun.
I used a dotter nail art tool for the dots. You can buy it online, I think I saw them going for $3.00 in ebay, but if you guys can't get a hold of one, you can use stuff you have around your house like a toothpick, a bobby pin, or the fine point of a orange wood stick cuticle pusher.
It's a very easy way to spice up your nail polish, it looks great and it's inexpensive.
Now, the nail polishes... I ADORE both shades! They are super interesting and unique. What I don't like is the brush on these. It's rounded and thick, and it makes the application very difficult for me. The formula is awesome, almost opaque in one coat, but I always give it at least 2, just for peace of mind (I hate visible nail line).
Anyways, what do you think about it? What other colors would look good together?
Pink Before You Leap swatch
Skin and health care in Winters
Hope you all had a great weekend!
The winter is knocking in, the wind has some chillness in it which feels good in the starting but gradually as it’ll grow, will bring a lot of problems with it. Every season has a beauty in itself but has some problems as well. These problems begin from our health and beauty especially our skin problems. Our skin takes some time to accept the changing weather and we get some problems in starting. Most people love cold weather and wait for it. October is called as pink weather; there is some coolness and some warmth mixed in it. It is very pleasant but the skin problems begin at the same time. But I think we’ll get some relax if we are careful in this weather. A good routine, good products and some care can solve all the difficulty and we can enjoy this weather.
What should we do?
Diet-
At first we should take care of our diet routine. The effect of what we eat reflects on our skin. In summers we consume a light and healthy diet with lots of fresh fruits and juice but in winter we need some rich and healthy light food, like lots of dry fruits which give a warm glow to our skin. We should give up the cold things like one can take hot soup instead of juice. Healthy hot soups work the same like fresh juice.

Exercise and Yoga-
Most of people give up their routine of yoga and exercise in cold. But in this weather work out is necessary for our health and beauty. If you don’t want a heavy workout, it’s okay. You can do some Yoga exercise, believe me it will give huge relax to your beauty but also will keep you away from many diseases. You’ll feel more fit and healthy.

Skin care routine-
A good skin care routine will save your skin from many problems of this weather. You should apply a good moisturizer in the morning and evening regularly. If you have dry skin the moisturizer should be rich which can give that oil and moisturizer balance which your skin needs. Normal skin also needs a rich moisturizer in this weather but if your skin is oily, it needs a normal moisturizer but regularly because oily skin also feels some dryness in this weather especially when it begins.

Night care routine-
You should clean your skin at night. The formula is the same. Dry skin needs rich cleanser and oily skin needs normal. After cleansing you should (especially dry skin) do a light massage with a good nourishing cream in circular motion very lightly, only five minutes and wipe the cream. You can apply a good night cream if needed otherwise you can go to bed after that.
So this was all about taking care of your skin and health in winters…What do you think ladies??? Hope it helps.
All images are taken from Google.


