Winged eyeliner is probably my favourite thing to wear when it comes to make-up. I wear it everyday and I think I would feel a bit naked without it! Since it's something I'm wearing all the time the number one question that I get asked by other people is could I tell them how to achieve it - what is the technique and what products are the best. So I thought I would do a post about it with a little bit of a picture demonstration which I hope you will be able to follow easily enough! I'll start off first with the products and brush that I use.......
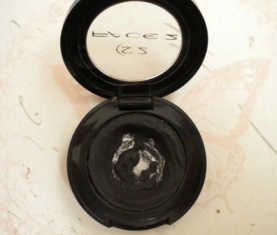

I generally use one of two products - either a cake or a gel liner. The one I'll talk about first and maybe my preferred of the two is a cake eyeliner. I use one by Face2 (as shown in the first photo above) which is an Irish brand that is stocked in our Make Up For Ever store here. For those of you elsewhere in the world I've been told that the Make Up For Ever one is very similar. So a cake eyeliner, for those of you who may be unfamiliar with them, basically looks like a poster paint. It's completely solid in the pot and you add water to it to turn it into a liquid. The reason I prefer this over a regular liquid liner is that you can mix it to the consistency that you want and also it lasts forever! I've had the one above for two years and while I've hit the metal pan in the centre there's still about half left! I also prefer it a bit more than a gel/cream liner because I find I can achieve a smoother line. The consistency that you want to mix this to should be really quite fluid but not overly watery - you want almost a creamy liquid. The one downside of a cake liner is that on darker skin tones it sometimes doesn't come out a very intense black colour like a gel liner does. While it may look black on fair skins if you're darker it may only look like a charcoal colour. So therefore you may need to go back over it a couple of times to get the intensity.
The second product which is also a great option is a gel or cream liner. The one I like to use is the Clinique Cream Liner (as shown in 2nd photo above). The Bobbi Brown one is also nice but it dries out halfway through the pot so I end up throwing half the product (and half my money!) away. The Clinique one stays creamy til the end. If you are a complete beginner with liner this type might be better for you as it's a bit more foolproof since it doesn't dry immediately giving you time to fix a mistake. The only thing I would say is to make sure you have enough on your brush. Gel and cream liners tend to be water resistant, unlike cake liner, and so are fantastic to wear on the waterline since they don't budge! They also tend to be a bit more long-wearing than the cake.
Now onto the brush.......

My favourite brush for liner is the LY24 from Louise Young. As you can see from the photo it has an extremely fine tip. I know this brand is not readily available to everyone so something similar would be the MAC 210 or any brush which is extremely fine. I've also heard of people even finding ones like this in art and hobby shops. Some other make-up artists use angled brushes and that might work for some people - whatever you find easier for you. I definitely find the original kind much easier to work with though.
So now a bit of a demonstration. I'm sure there's other ways to achieve this but this is just my technique. Don't try to do the whole thing all in one sweep without lifting your brush as you'll lose all precision. I break it down into three steps which I've shown below..........
 Step 1. Draw a thin line close to your eyelashes. Don't worry about any wing just yet. This line also doesn't need to be overly neat as we'll be going over it again later anyway. It's *really* important to tilt your head backwards when doing liner because you need your eyelid to be as flat and smooth as possible so that you get a nice fluid line.
 Step 2. Draw in the outer line of your wing. This should generally angle upwards in the same direction as your lower lash line. Just imagine that your lower lash line is continuing on upwards. If you have a hooded eye, however, you may need to angle your liner slightly more outwards in order to avoid the hooded area. The length of your wing is down to personal preference. If you want a dramatic liner make the wing longer and make it shorter for a more subtle one.
 Step 3. Now you need to connect the wing back to the line along your eyelashes. I've mapped it out here in red. Don't start at the very tip of your wing. Leave the very top of it alone as that part should be left extremely fine. Now connect the wing back down along your eye, gradually making it thinner as you reach the inner corner of your eye. So it should be thicker on the outer part of your eye and thinner towards the inner corner.

...........
That's it! If you need to go over it again to fix any lumps or bumps or to thicken it then you can. Now you just need to line your waterline if you want to and apply your mascara and you're done!
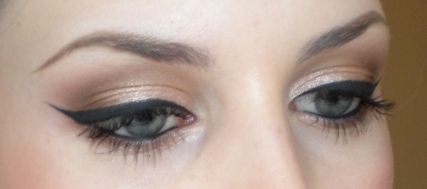
Here's the finished look with a lined waterline and some mascara.........


I really hope that all made sense and that is was useful to somebody! If you have any questions just write me a comment below!
Let me know if you gave it a try and how you got on!

I generally use one of two products - either a cake or a gel liner. The one I'll talk about first and maybe my preferred of the two is a cake eyeliner. I use one by Face2 (as shown in the first photo above) which is an Irish brand that is stocked in our Make Up For Ever store here. For those of you elsewhere in the world I've been told that the Make Up For Ever one is very similar. So a cake eyeliner, for those of you who may be unfamiliar with them, basically looks like a poster paint. It's completely solid in the pot and you add water to it to turn it into a liquid. The reason I prefer this over a regular liquid liner is that you can mix it to the consistency that you want and also it lasts forever! I've had the one above for two years and while I've hit the metal pan in the centre there's still about half left! I also prefer it a bit more than a gel/cream liner because I find I can achieve a smoother line. The consistency that you want to mix this to should be really quite fluid but not overly watery - you want almost a creamy liquid. The one downside of a cake liner is that on darker skin tones it sometimes doesn't come out a very intense black colour like a gel liner does. While it may look black on fair skins if you're darker it may only look like a charcoal colour. So therefore you may need to go back over it a couple of times to get the intensity.
The second product which is also a great option is a gel or cream liner. The one I like to use is the Clinique Cream Liner (as shown in 2nd photo above). The Bobbi Brown one is also nice but it dries out halfway through the pot so I end up throwing half the product (and half my money!) away. The Clinique one stays creamy til the end. If you are a complete beginner with liner this type might be better for you as it's a bit more foolproof since it doesn't dry immediately giving you time to fix a mistake. The only thing I would say is to make sure you have enough on your brush. Gel and cream liners tend to be water resistant, unlike cake liner, and so are fantastic to wear on the waterline since they don't budge! They also tend to be a bit more long-wearing than the cake.
Now onto the brush.......
My favourite brush for liner is the LY24 from Louise Young. As you can see from the photo it has an extremely fine tip. I know this brand is not readily available to everyone so something similar would be the MAC 210 or any brush which is extremely fine. I've also heard of people even finding ones like this in art and hobby shops. Some other make-up artists use angled brushes and that might work for some people - whatever you find easier for you. I definitely find the original kind much easier to work with though.
So now a bit of a demonstration. I'm sure there's other ways to achieve this but this is just my technique. Don't try to do the whole thing all in one sweep without lifting your brush as you'll lose all precision. I break it down into three steps which I've shown below..........
 Step 1. Draw a thin line close to your eyelashes. Don't worry about any wing just yet. This line also doesn't need to be overly neat as we'll be going over it again later anyway. It's *really* important to tilt your head backwards when doing liner because you need your eyelid to be as flat and smooth as possible so that you get a nice fluid line.
 Step 2. Draw in the outer line of your wing. This should generally angle upwards in the same direction as your lower lash line. Just imagine that your lower lash line is continuing on upwards. If you have a hooded eye, however, you may need to angle your liner slightly more outwards in order to avoid the hooded area. The length of your wing is down to personal preference. If you want a dramatic liner make the wing longer and make it shorter for a more subtle one.
 Step 3. Now you need to connect the wing back to the line along your eyelashes. I've mapped it out here in red. Don't start at the very tip of your wing. Leave the very top of it alone as that part should be left extremely fine. Now connect the wing back down along your eye, gradually making it thinner as you reach the inner corner of your eye. So it should be thicker on the outer part of your eye and thinner towards the inner corner.
...........
That's it! If you need to go over it again to fix any lumps or bumps or to thicken it then you can. Now you just need to line your waterline if you want to and apply your mascara and you're done!

I really hope that all made sense and that is was useful to somebody! If you have any questions just write me a comment below!
Let me know if you gave it a try and how you got on!

